In the previous post, we created a Microsoft Teams app and bot so we can use the Graph API. We should now have a “client id” and a “client secret” that is needed to make authentication requests, and get a user’s access token.
Install Laravel
To make things simple, we’ll be building the authentication code using the Laravel v8 PHP framework. Also please note, I’m more focused about functionality, so I won’t worry about code design and architecture. All the code will live in the routes/web.php file as part of a closure. In a production environment, we’d want to split that code out to Controllers and make sure our components are placed in logical places where we can reuse code.
There are plenty of good, existing oAuth clients for PHP, like the one from the PHP League, but we’ll be rolling our own. If you need to integrate with multiple services, I would highly recommend using one of those packages. Since all we’re doing is Microsoft, we’ll be using the HTTP client that comes with Laravel, and creating the system directly.
Auth button
Let’s start with a button that the user will click and then be directed to login with Microsoft. Open up the /resources/views/welcome.blade.php file and replace the <body> with a simple button.
<body>
    <div style="width:300px;margin:20px auto;">
        <a href="/login">
            <button style="border:1px solid #999;padding:10px">Login with Microsoft</button>
        </a>
    </div>
</body>
Now, when they click the button and go to our /login route, we need to redirect them to the Microsoft login page. So open the routes/web.php file and add the new route.
Route::get('login', function() {
   $authUrl = 'https://login.microsoftonline.com/common/oauth2/v2.0/authorize';
   return redirect()->away($authUrl);
});
Now if we try to login, we’ll get an error page on Microsoft
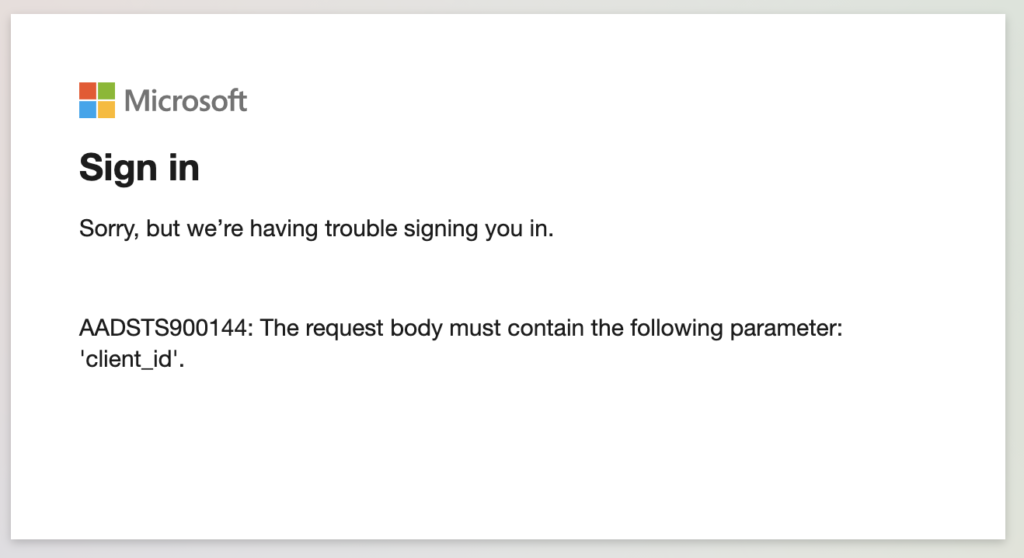
We need to update the login code to add the needed parameters to our redirect url. First off, we should save our client id and secret somewhere. In the root directory of Laravel should be a .env file, where we can store our environment variables
MICROSOFT_CLIENT_ID=11111111-2222-3333-aaaa-bbbbbbbbbbbb
MICROSOFT_CLIENT_SECRET=tOtallYfAkeSecRet
Then open up /config/services.php and add a new third party configuration
'microsoft' => [
        'client_id'     => env('MICROSOFT_CLIENT_ID'),
        'client_secret' => env('MICROSOFT_CLIENT_SECRET')
  ]
Now we can update our login code to add in the needed parameters.
Route::get('login', function () {
    $authUrl = 'https://login.microsoftonline.com/common/oauth2/v2.0/authorize';
    $query   = http_build_query([
        'client_id'     => config('services.microsoft.client_id'),
        'client_secret' => config('services.microsoft.client_secret'),
        'response_type' => 'code',
        'redirect_uri'  => secure_url('/login-redirect'),
        'scope'         => 'User.Read offline_access'
    ]);

    return redirect()->away($authUrl . '?' . $query);
})->name('login');
These are the minimum parameters we need to auth with Microsoft and get a user’s access token. There are more possible values depending on our need. The “response_type” of “code” is basically telling Microsoft we want to exchange for an access token, the “redirect_uri” is where the user goes after logging in to Microsoft, and “scope” are the permissions that the user is allowing our app to have. I have a separate post planned that will go into details about scopes, but for now, we’re just getting basic user information.
Now, if we hit our button, we’ll probably see this page:
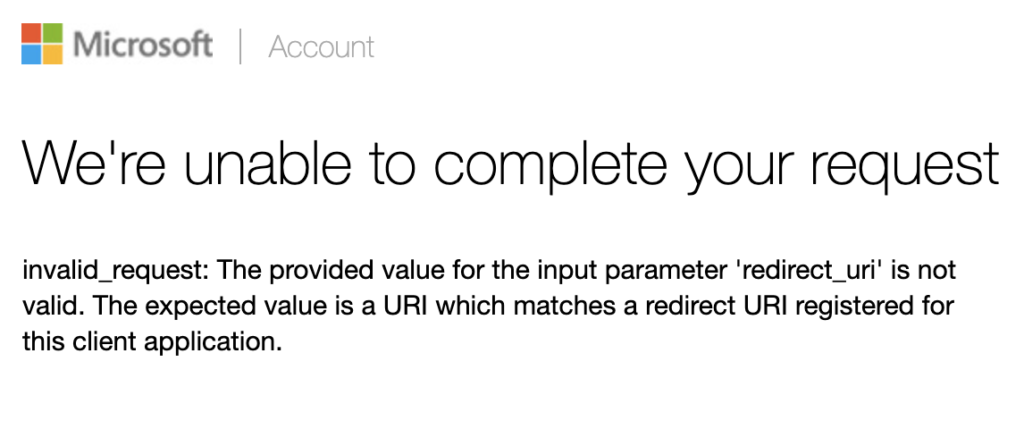
To setup a correct redirect uri, we’ll need to venture into the AZURE PORTAL!
Updating the app in the Azure Portal
The Azure portal has a LOT in it. Seriously. Maybe that’s the curse of cloud-based admin portals, because AWS dashboard has a similar issue. But I’ll try to break it down easy enough, so we can get our app working.
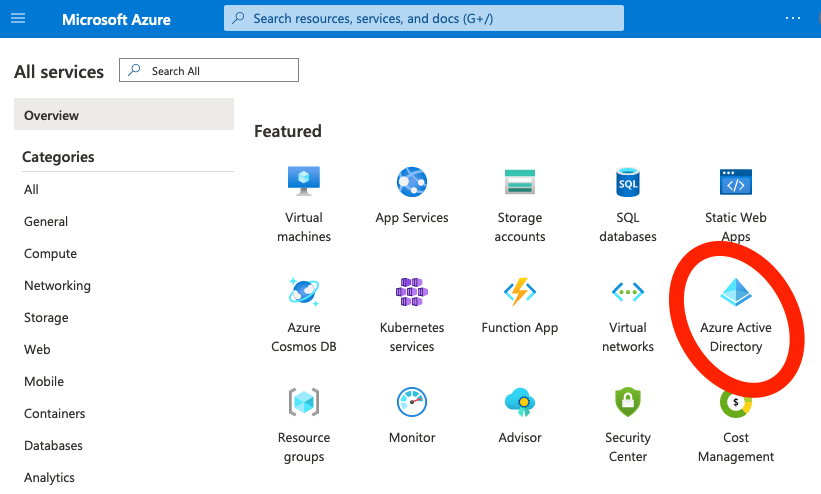
Step 1, go to All Services and click “Azure Active Directory”:
Step 2, click “App registrations” in the left menu, and if you’re logged in with the same account that created the app in App Studio, you should see that app listed:
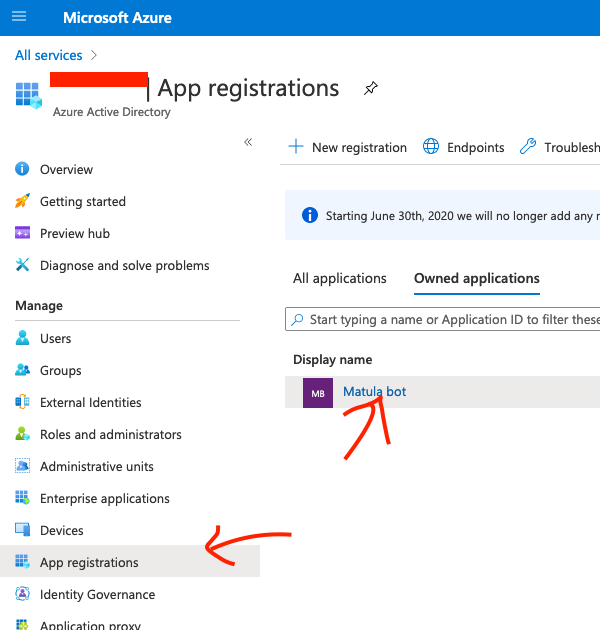
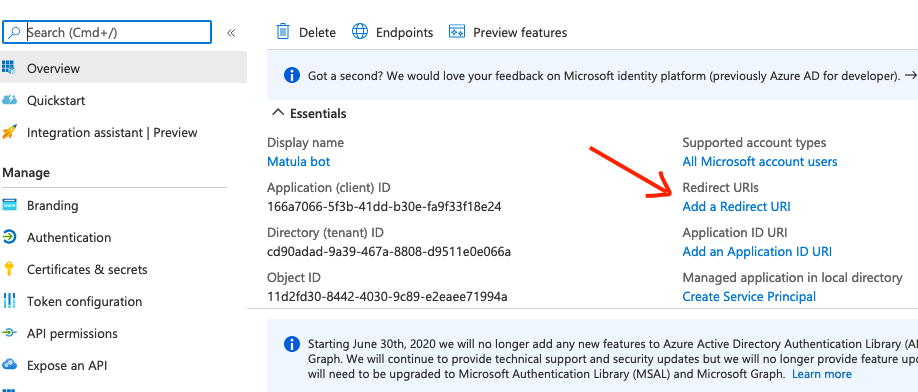
Step 3, click the app and then click the “Add a Redirect URI” link:
Step 4, click “Add a platform”. A pop-out window on the right should show up with various options. Since, we’re logging in through a website that sends the user to Microsoft to login, we’ll select “Web”. The Microsoft docs go into more detail about the other options.
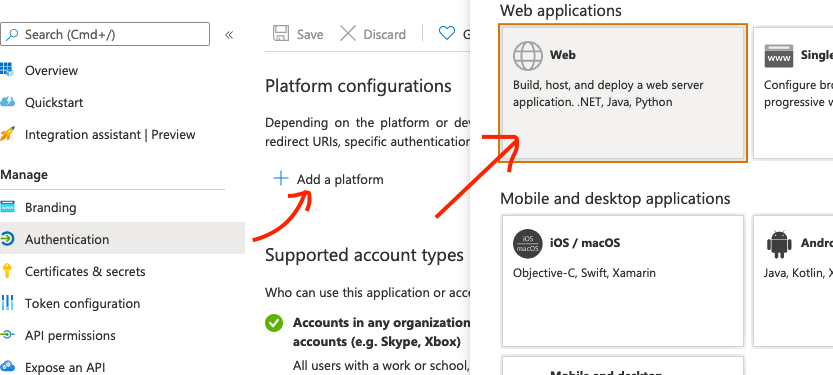
Step 5, finally add the full url you want to redirect the user to after they log in. If you’re developing locally, Microsoft lets you use http://localhost/... but otherwise it must be https. Also, the uri is case sensitive, so make sure what you use in the portal is exactly the same when we send it doing the auth.
Finish Logging In
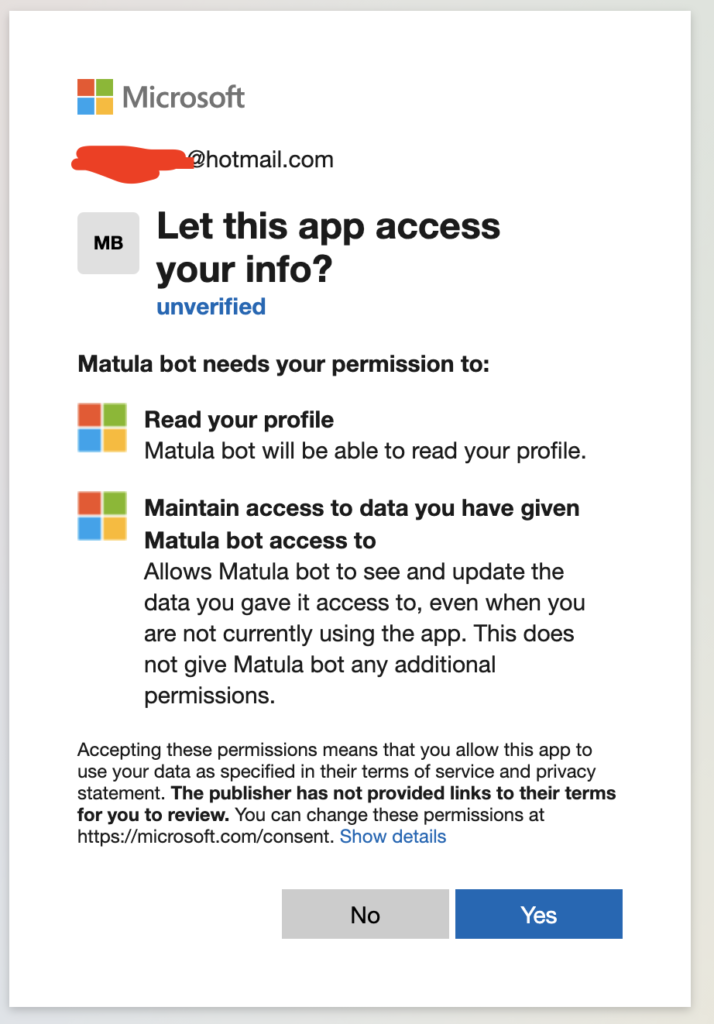
Now let’s go back and try the login button again. This time, we should be greeted on Microsoft by either a login screen, or maybe a login select list. After logging in, we’ll get a page asking us to approve the scopes/permissions we asked for.
Microsoft has two different “flavors” of user – Personal and Work. The Personal user will usually be someone with a “hotmail/live/outlook.com” email account… and the Work user will login with their company email, though on occasion it will be something like “@mycompany.onmicrosoft.com”. The two account types process things a little differently on Microsoft’s backend. For example, a Personal account permission screen will look like:
A Work account will look like:
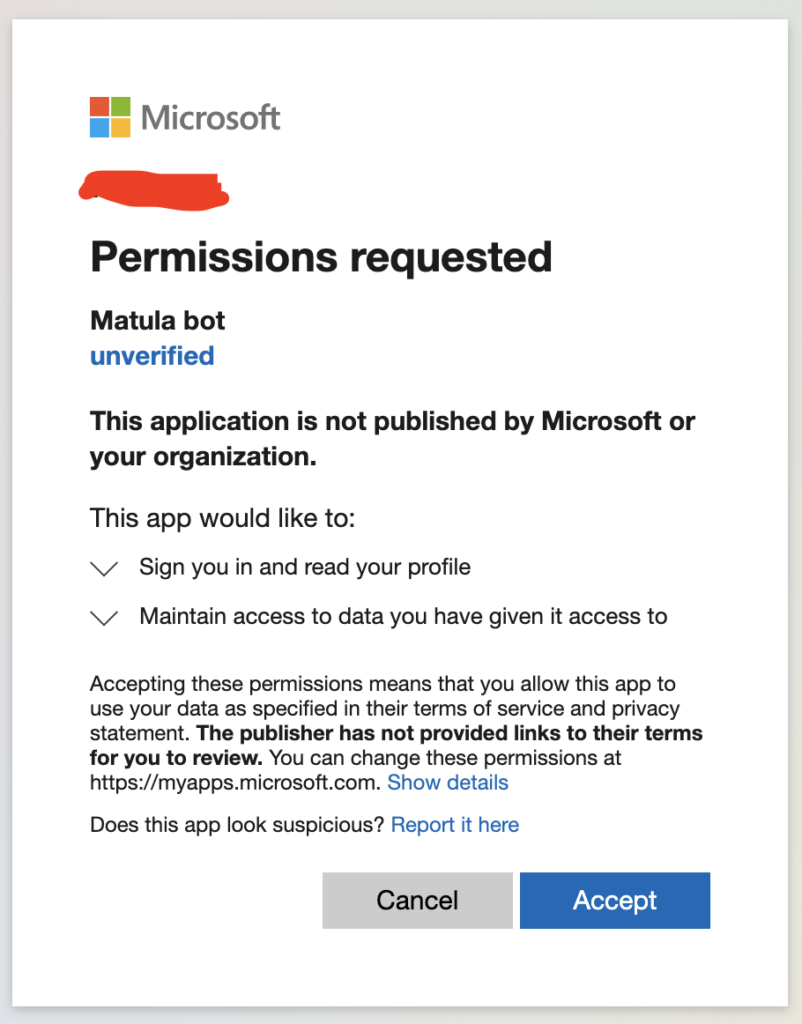
Once you click “Accept” you’ll be taken back to the “redirect_uri” we specified in our login route. I’ve set it to secure_url('/login-redirect') which creates an “https” url for our route, though if you’re using localhost, it could be just url('/login-redirect'). We can build that route simply like so:
Route::get('login-redirect', function (\Illuminate\Http\Request $request) {
    return $request->all();
})->name('login.redirect');
Now, if you click “Accept” on the Microsoft site, you get back to our redirect page, and will show a “code” (on Work accounts, they might be a “session_state” value as well). We need to use that code and make another call to a Microsoft api to exchange it for an actual access token. Let’s update that function:
Route::get('login-redirect', function (\Illuminate\Http\Request $request) {
    $authReponse = \Illuminate\Support\Facades\Http::asForm()->post('https://login.microsoftonline.com/common/oauth2/v2.0/token', [
        'client_id'     => config('services.microsoft.client_id'),
        'client_secret' => config('services.microsoft.client_secret'),
        'code'          => $request->input('code'),
        'grant_type'    => 'authorization_code',
        'redirect_uri'  => secure_url('/login-redirect')
    ]);

    return $authReponse;
})->name('login.redirect');
There are a couple of caveats here. It doesn’t seem like the “token” api accepts a json payload, so we have to send it as application/x-www-form-urlencoded, hence the “asForm()” method. Also, for Personal accounts we don’t need the “redirect_uri” but it IS needed for Work accounts. It’s best to just leave it as a default.
Once again, if we go through the login process, we should be redirected back to our page and see the values returned when we asked for an access token:
{
    token_type: "Bearer",
    scope: "User.Read", // "User.Read profile openid email" on Work accounts
    expires_in: 3600,
    ext_expires_in: 3600,
    access_token: "eyJ123abc....",
    refresh_token: "M.R123abc..."
}
The access token for Work accounts is actually a JWT, and could be decoded at this point to get some basic info about the user. For Personal accounts, it looks like just a long random string. Also, the list of “scopes” that are returned differ depending on if it’s a Personal or Work account.
Quick note: I'll cover scopes in another post, but be warned
that Personal account logins will strip any scopes they don't
support, and succeed in logging in. Work accounts will return
an error letting you know the scope wasn't accepted.
In a full app, we’ll want to store the “refresh_token”, so we can get a new access token without asking the user to log in again. We’d also store the access token, possibly in a cache since it expires in an hour.
Now we can use the token directly, and make our first request to the Graph API. With the one scope we requested, it pretty much only allows us access to the “/me” endpoint.
Route::get('login-redirect', function (\Illuminate\Http\Request $request) {
    $authReponse = \Illuminate\Support\Facades\Http::asForm()->post('https://login.microsoftonline.com/common/oauth2/v2.0/token', [
        'client_id'     => config('services.microsoft.client_id'),
        'client_secret' => config('services.microsoft.client_secret'),
        'code'          => $request->input('code'),
        'grant_type'    => 'authorization_code',
        'redirect_uri'  => secure_url('/login-redirect')
    ]);

    $accessToken = $authReponse['access_token'];

    return \Illuminate\Support\Facades\Http::withToken($accessToken)->get('https://graph.microsoft.com/v1.0/me');
})->name('login.redirect');
In this code, we grab the access token from token response. Laravel’s Http class has a handy withToken() method that adds a “Bearer” token to our request header. Then we hit the ‘/v1.0/me’ endpoint… though we could do ‘/beta/me’. Those beta endpoints are stable, and while they suggest not using them in production, it’s never been an issue and they often have more functionality.
If we login once more, we’ll get our information returned from the Graph API:
{
    @odata.context: "https://graph.microsoft.com/v1.0/$metadata#users/$entity",
    displayName: "Firstname Lastname",
    surname: "Lastname",
    givenName: "Firstname",
    id: "978.....",
    userPrincipalName: "...@hotmail.com",
    businessPhones: [ ],
    jobTitle: null,
    mail: null,
    mobilePhone: null,
    officeLocation: null,
    preferredLanguage: null
}
If you use the “/beta/me” endpoint with a Work account, you’ll actually get a LOT more information, like the licenses that are assigned to the user.
So now we:
- Have our Teams app and bot
- Can request an access token
- Can get information from the Graph API
In the next post, I’ll go into more detail about the scopes and various things we can do in Teams.